Month: March 2025

How to Deploy a Proxmox Ceph Cluster for High-Availability Storage
Deploying a hyperconverged Proxmox cluster integrated with Ceph storage enhances your infrastructure’s scalability, reliability, and performance. This guide walks you through setting up such a cluster, ensuring a robust virtualization environment with efficient storage management.
Looking to understand Proxmox clustering first? Here is our guide on setting up a Proxmox Cluster.
Why Combine Proxmox with Ceph?
Proxmox Virtual Environment (VE) is an open-source platform for enterprise virtualization, combining KVM hypervisor and LXC containers. Integrating Ceph, a distributed storage system, provides:
- Scalability: Easily expand storage by adding new nodes.
- High Availability: Data replication across nodes ensures redundancy.
- Performance: Efficient data distribution optimizes read/write operations.
Prerequisites
Before starting, ensure you have:
- Hardware:
- CPU: Adequate cores; OSD services benefit from higher frequencies and multiple cores.
- Memory: Sufficient RAM; consider both VM/container needs and Ceph’s requirements.
- Storage: Dedicated disks for Ceph OSDs; uniform disk sizes are recommended.
- Network: Reliable networking; separate networks for public and cluster traffic enhance performance.
- Software:
- Proxmox VE installed on all nodes.
Step 1: Set Up the Proxmox Cluster

- Create Cluster on First Node:
- Navigate to Datacenter > Cluster in the Proxmox web interface.
- Click Create Cluster, provide a Cluster Name, and specify the Cluster Network.
- Click Create.
- Join Additional Nodes:
- On each additional node, navigate to Datacenter > Cluster.
- Click Join Cluster, enter the Cluster Join Information from the first node, and click Join.
Step 2: Install Ceph on All Nodes

- Access the First Node:
- Navigate to Ceph in the Proxmox web interface.
- Click Install Ceph, select the desired Ceph version and subscription, and start the installation.
- Configure Networks:
- Define the Public Network and Cluster Network under Configuration.
- Select Y at the Setup Installation prompt if everything looks correct.
- Configure IP subnet
- Repeat on Remaining Nodes.
Step 3: Configure Ceph OSDs

- Prepare Disks:
- Navigate to Disks to verify disk availability.
- Create OSDs:
- On each node, go to Ceph > OSD, click Create OSD, select the disk, and click Create.
Step 4: Create Ceph Pools

-
- Navigate to Pools:
- Go to Ceph > Pools, click Create Pool.
- Configure Pool:
- Name the pool (e.g., vm_storage).
- Set the Size (number of replicas; typically 3) and click Create.
- Navigate to Pools:
Step 5: Set Up Ceph Monitors and Managers

- Add Monitors:
- Navigate to Ceph > Monitor and click Create Monitor.
- Add to all existing nodes.
Testing Live Migrations In Your Proxmox Ceph Environment
Once your Proxmox Ceph cluster is set up with three monitor nodes and integrated storage, you’ll have a distributed shared storage system across all hosts. This enables seamless live migration of virtual machines between nodes with minimal downtime, transferring only the memory map rather than entire disk images.
The cluster ensures high availability and fault tolerance, maintaining operations if a node fails, while pooling storage resources for efficient use. You’ll also benefit from simplified management through the Proxmox interface, supporting resilient, scalable virtualization—ideal for testing or small-scale deployments, even in nested environments.
Common Proxmox Ceph Cluster Troubleshooting Issues & Fixes
Issue |
Possible Cause |
Solution |
| Slow Read/Write Speeds | Network bottlenecks or high CPU usage | Ensure dedicated Ceph network and enable jumbo frames |
| OSD Crashes | Disk failure or corruption | Replace faulty disk and rebalance cluster with ceph osd out <ID> |
| Monitors Going Offline | Network issues or insufficient resources | Restart monitor service: systemctl restart ceph-mon@<hostname> |
| Cluster in HEALTH_WARN State | Imbalanced distribution or high disk usage | Run ceph pg rebalance to fix data placement |
Setting up a hyper-converged Proxmox Ceph Cluster provides a scalable, high-availability infrastructure suitable for enterprise workloads.
If you’re considering managed private cloud solutions, HorizonIQ provides tailored infrastructure expertise. Contact us today to learn more.
Explore HorizonIQ
Bare Metal
LEARN MORE
Stay Connected


About Author


Proxmox vs OpenStack: Choosing the Right Private Cloud Platform for Your Business
As organizations move toward private cloud solutions, two open-source platforms—OpenStack and Proxmox—frequently come up in the decision-making process. Both offer powerful virtualization and cloud management capabilities but cater to different needs.
Understanding their differences in features, scalability, and use cases will help you select the right platform for your private cloud deployment. This guide will compare OpenStack and Proxmox through the lens of reliability, flexibility, and proactive management—key pillars that drive cloud success.
Feature Comparison: OpenStack vs Proxmox
Architecture & Virtualization Approach
- OpenStack: A modular cloud computing platform for large-scale deployments. It offers a software-defined approach to compute, networking, and storage.
- Proxmox: A hyperconverged virtualization solution that combines KVM-based virtual machines and LXC containers with built-in clustering and storage management.
Scalability
- OpenStack: Built for hyperscale infrastructure, supporting thousands of nodes across multiple data centers.
- Proxmox: Scales well but is more suited for SMBs and mid-size enterprise deployments.
Ease of Deployment & Management
- OpenStack: Requires significant expertise to deploy and manage, best for businesses with dedicated DevOps teams.
- Proxmox: Offers an intuitive web-based UI and a simpler deployment process, making it ideal for IT admins looking for cost-efficient, scalable solutions.
Storage & Networking
- OpenStack: Provides software-defined networking (SDN), distributed block storage, and advanced security.
- Proxmox: Supports Ceph integration, ZFS, and traditional storage methods but lacks OpenStack’s networking flexibility.
High Availability & Clustering
- OpenStack: Designed for highly available, distributed workloads with built-in redundancy and failover.
- Proxmox: Supports high availability clustering, but scaling beyond a few dozen nodes requires additional configuration.
Proxmox vs OpenStack Use Cases
OpenStack and Proxmox cater to different business needs, so it’s essential to align your choice with your infrastructure goals. The following comparison will help you determine which platform is the best fit for your organization.
| Factor | OpenStack | Proxmox |
| Enterprise Data Centers | ✅ Ideal for large-scale, multi-tenant clouds | ❌ Limited scalability |
| Small-Medium Businesses (SMBs) | ❌ Overkill | ✅ Best choice for ease of use |
| Compliance & Security Needs | ✅ Advanced security & compliance controls | ✅ Robust security for smaller deployments |
| Hybrid & Edge Deployments | ✅ Flexible integrations | ❌ Less suited |
| AI & Big Data Workloads | ✅ Optimized for GPU & HPC | ❌ Less optimized for large-scale HPC |
Where HorizonIQ Comes In
Whether you choose OpenStack or Proxmox, your private cloud infrastructure should be reliable, scalable, and cost-effective. At HorizonIQ, we provide a single-tenant private cloud architecture with proactive management tools like Compass to optimize IT performance and costs.
Key Benefits with HorizonIQ:
- Reliability: Uninterrupted operations with redundant infrastructure and a 100% uptime SLA.
- Flexibility: Scalable, customizable solutions to match evolving business needs.
- Fully Managed: A partner-driven approach with white-glove support, ensuring alignment with your business goals.
- Cost Savings: Up to 70% reduction in IT costs with proprietary tools and optimized pricing models.
- Global Reach: Nine strategically located regions to minimize latency and maximize performance.
- Proactive Management: Our management portal provides real-time cost control, visibility, and security compliance.
Which Private Cloud Solution is Right for You?
- Choose OpenStack if you need an enterprise-grade, multi-tenant cloud with deep networking and security features.
- Choose Proxmox if you seek a cost-effective, easy-to-deploy virtualization solution for SMBs and mid-size enterprises.
Both platforms have their advantages, but a future-proof private cloud strategy requires expert management, compliance assurance, and cost efficiency.
Looking for a tailored private cloud solution? Contact us today to discover how we can optimize your IT infrastructure.
Explore HorizonIQ
Bare Metal
LEARN MORE
Stay Connected
About Author

Are you looking to simplify the management of multiple Proxmox nodes? A Proxmox cluster allows you to manage multiple nodes from a single interface, making administration more efficient and improving operational control.
While this article won’t cover Ceph storage or high availability setup, we’ll focus on creating, managing, and troubleshooting a Proxmox cluster to help you streamline workloads and enhance centralized management.
Why Deploy a Proxmox Cluster?
A Proxmox cluster is a group of interconnected Proxmox Virtual Environment (PVE) nodes that allows for seamless management, scaling, and security. Clustering is beneficial because:
- Provides a centralized GUI (Graphical User Interface) to manage multiple servers.
- Enables resource balancing across nodes for better performance.
- Supports business continuity by reducing downtime.
- Enhances security and compliance by simplifying infrastructure oversight.
As organizations shift toward private cloud environments for better control, compliance, and security, understanding how to deploy a Proxmox cluster effectively is essential.
Prerequisites for Deployment
Before you begin, make sure that:
- You have at least two or more Proxmox nodes.
- All nodes are updated to the latest version of Proxmox.
- Each node has a unique hostname and static IP address.
- VMs are backed up before clustering to prevent data loss.
- Nodes are connected to the same network.
- Your cluster architecture aligns with scalability and compliance requirements.
Step 1: Prepare Your Proxmox Nodes
1.1 Update Proxmox
For stability and security, update the package database on each node:

Step 2: Create a Proxmox Cluster

2.1 Create a Cluster on the First Node
- Navigate to Data Center > Cluster.
- Click Create Cluster.
- Enter a Cluster Name.
- Set the Cluster Network (IP address of the primary node).
- Click Create.
Once the cluster is created, Proxmox will generate a Join Information Token, which will be used to add additional nodes.
Step 3: Add Nodes to the Cluster

3.1 Join Additional Nodes
- Copy the Join Information Token from the primary node.
- Log into the second node and navigate to Data Center > Cluster.
- Click Join Cluster.

- Paste the Join Information Token.
- Enter the peer’s root password of the primary node.
- Set the IP for the node you want to join.
- Click Join and wait for the process to complete.
If the process fails, double check that:
- There are no running VMs on the node.
- The node does not have conflicting VM IDs.
Repeat the process for additional nodes.
Pro tip: This is where Proxmox Backup Server comes in handy. If the process fails, you have your VMs ready for easy restoration.
Step 4: Verify Cluster Status
Run the following command to check the cluster:
pvecm status
This will list all nodes, their IDs, and quorum status, ensuring operational stability and performance consistency.
How Do I Remove Nodes From the Cluster?
5.1 Shut Down the Node
Power off the node to remove:
shutdown -h now
5.2 Delete the Node
From an active node:
pvecm delnode <nodename>
For a two-node cluster losing quorum:
pvecm expected 1 # On the remaining node to restore functionality
Pro tip: If you only have two nodes, you may need a fresh reinstall to remove a node due to quorum limitations. Reinstallation is an option if the cluster database is corrupted, but not required.
Troubleshooting Common Issues
1. Node Fails to Join the Cluster
- Ensure VMs are stopped or removed before joining.
- Verify all nodes are on the same Proxmox version.
- Restart cluster services if necessary:
systemctl restart pve-cluster
2. Cluster Join Hangs or Errors Out
- Refresh the Proxmox GUI.
- Manually restart Proxmox services:
systemctl restart corosync
Ready to Deploy Your Proxmox Cluster?
Deploying a Proxmox cluster is a cost-effective, scalable, and secure way to manage virtualization environments efficiently. By following this step-by-step guide, you can set up a cluster, add nodes, and troubleshoot common issues while ensuring compliance, stability, and high performance.
For businesses and IT professionals looking for a tailored solution, HorizonIQ provides secure, scalable, and managed infrastructure services that align with modern compliance and cost-efficiency needs. Contact us today to learn more.
Explore HorizonIQ
Bare Metal
LEARN MORE
Stay Connected
About Author

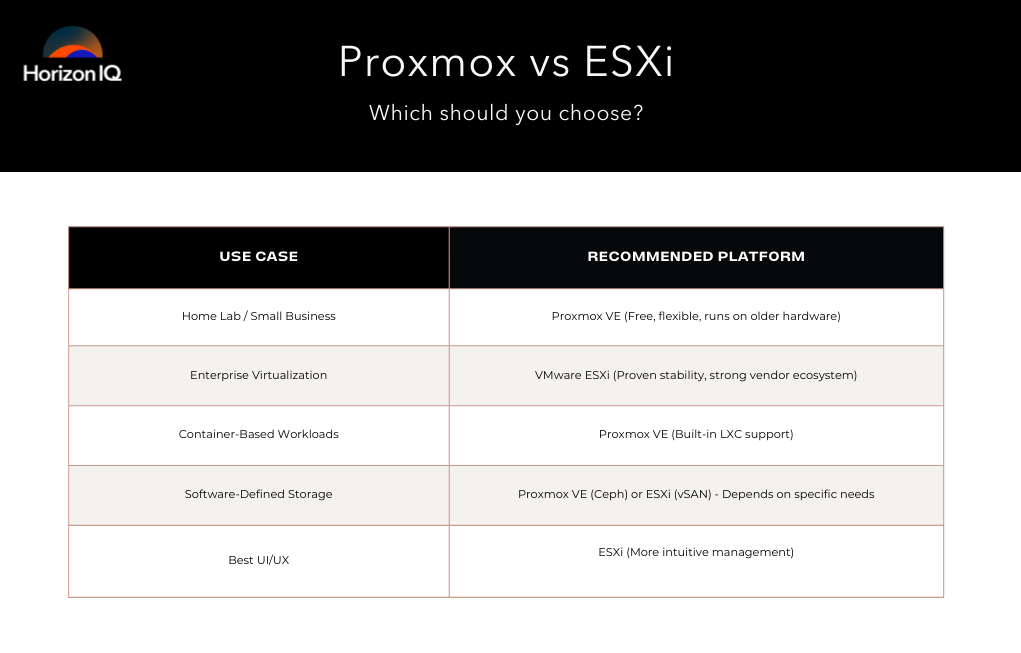
Are you trying to decide between Proxmox vs ESXi for your virtualization needs? While these two popular hypervisor solutions offer virtualization capabilities, they differ significantly in terms of pricing, features, and usability.
Let’s compare Proxmox vs ESXi to help you determine which is the best fit for your needs.
What is Proxmox VE?
Proxmox VE is an open-source hypervisor based on Debian Linux, integrating Kernel-based Virtual Machine (KVM) for full virtualization and LXC for container-based virtualization.
It is completely free to use, with all enterprise features available without licensing fees. Proxmox also offers a subscription-based support model for those who require professional assistance.
Key Features of Proxmox:
- Open-source with all enterprise features enabled by default.
- Supports a wide variety of storage backends such as iSCSI, NFS, GlusterFS, ZFS, LVM, and Ceph.
- Includes built-in clustering and high availability without additional costs.
- Supports both full virtualization (KVM) and container-based virtualization (LXC).
- Can run on older hardware, supporting non-VT-enabled CPUs for container-based workloads.
What is VMware ESXi?
VMware ESXi is a proprietary hypervisor widely used in enterprise environments. While VMware historically offered a free version of ESXi, recent versions require a paid license to unlock full functionality. The platform is well-known for its stability, strong ecosystem support, and enterprise-grade features.
Key Features of VMware ESXi:
- Industry-leading stability and performance.
- Advanced networking features such as vNetwork Distributed Switch (vDS).
- Extensive integrations with third-party vendors.
- Supports enterprise-grade backup and disaster recovery solutions.
- Requires licensing for essential features like vCenter, clustering, and advanced storage options.
What are the Key Differences Between Proxmox vs ESXi?
While Proxmox is free and open-source, ESXi requires a paid license for full functionality. Key differences include their support for containers, storage options, and high availability features, making each platform more suitable for specific use cases depending on hardware, budget, and scalability needs.
| Feature | Proxmox | VMware ESXi |
| License Cost | Free & Open Source | Paid License Required |
| Full Virtualization | KVM | Proprietary VMware Hypervisor |
| Container Support | LXC | No native support |
| Storage Options | Ceph, ZFS, iSCSI, NFS, GlusterFS, etc. | vSAN, VMFS, iSCSI, NFS |
| Networking | Linux Bridges, Open vSwitch | Standard vSwitch, vDS (requires licensing) |
| High Availability (HA) | Built-in, free | Requires vCenter and paid license |
| Hardware Requirements | Runs on older hardware | Requires newer hardware, drops support for older devices |
| Backup Solutions | Growing ecosystem, open-source options | Extensive commercial solutions available |
Performance Comparison: Proxmox vs. ESXi with NVMe/TCP
To compare real-world performance, a benchmark test was conducted by Blockbridge using Proxmox VE 7.2 and VMware ESXi 7.0 Update 3c on identical hardware:
- Test Server: Dell PowerEdge R7515
- CPU: AMD EPYC 7452 (32-Core)
- Networking: Mellanox 100Gbit
- Storage Backend: NVMe/TCP with Blockbridge 6
- Workload: 32 Ubuntu virtual machines, each with 4 vCPUs and a single virtual disk running fio benchmarks.
Key Findings:
- ESXi relies heavily on SCSI-based storage virtualization, which introduces a slight performance overhead when using NVMe devices.
- Proxmox, using native KVM/QEMU storage drivers, achieved lower latency and higher IOPS in high-throughput scenarios.
- VMware’s vSAN and VMFS file systems provide more mature enterprise storage management but require additional licensing fees.
The benchmark test revealed that Proxmox VE 7.2 outperformed VMware ESXi 7.0 Update 3c in high-throughput scenarios due to its native KVM/QEMU storage drivers. This resulted in lower latency and higher IOPS. In contrast, ESXi’s reliance on SCSI-based storage virtualization introduced slight performance overhead when using NVMe devices.
While VMware’s vSAN and VMFS offer more mature enterprise storage management features, they come with additional licensing costs, making Proxmox a more cost-effective choice for performance-focused workloads.
What Is the Installation and Hardware Compatibility?
When it comes to setting up a virtualization platform, Proxmox delivers a hassle-free experience through its ISO-based installer, seamlessly accommodating a variety of systems—from cutting-edge servers to aging hardware—without rigid requirements.
VMware ESXi keeps installation simple but imposes stricter hardware demands, especially for network components, and tends to phase out compatibility with legacy systems as updates roll out.
Proxmox Installation:
- Straightforward ISO installation.
- Supports a wide range of hardware and network adapters out of the box.
- Runs on both old and new hardware without strict hardware validation.
ESXi Installation:
- Also features a simple installation process.
- Requires specific hardware compatibility, particularly for network adapters.
- Older hardware often loses official support in newer ESXi releases (e.g., Dell R410s are unsupported in ESXi 6+).
How Does the User Interface and Management Work?
Managing virtual environments in Proxmox feels intuitive thanks to its web-based dashboard, which leans on a familiar Linux networking framework to streamline operations.
VMware ESXi, meanwhile, ups the ante with a sleek, professional-grade interface—elevated further by vSphere—but unlocking its full potential often means investing in a vCenter license. As VMware shifts toward an Electron app for future management, Proxmox sticks to its reliable web-based roots.
- Proxmox uses a web-based interface (accessible via port 8006) with a Linux-style networking model.
- ESXi has a more polished UI, with vSphere providing a unified management experience. However, full functionality requires vCenter licensing.
- VMware is moving towards an Electron app for management, while Proxmox retains a web-based approach.
How Does Clustering and High Availability Work?
For those building resilient and scalable systems, Proxmox VE stands out by embedding clustering and high availability tools directly into its platform, all without extra fees.
VMware ESXi, by contrast, reserves these advanced capabilities for users willing to pair it with vCenter, which drives up costs.
- Proxmox VE offers built-in clustering and high availability at no extra cost.
- ESXi requires vCenter to enable clustering and HA, adding to licensing costs.
Proxmox vs. ESXi: Which One Should You Choose?
Proxmox VE offers a compelling alternative with all features unlocked for those on a budget or seeking open-source flexibility.
If you require a highly polished enterprise solution with extensive vendor support, VMware ESXi is still a top choice—provided you are willing to pay for licensing.
OpenStack as an Alternative Consideration
OpenStack is a cloud-scale virtualization ecosystem worth exploring if you’re looking for an alternative outside of traditional hypervisors.
However, OpenStack is not a simple one-weekend experiment—it is best suited for larger-scale deployments requiring deep infrastructure automation.
VMware vs Proxmox? HorizonIQ Has You Covered
At HorizonIQ, we offer flexible solutions to meet your virtualization needs, supporting both VMware and Proxmox VE platforms. Our Managed Private Cloud, built on VMware, is designed for customers requiring scalability, security, and high availability.
This fully managed service provides a dedicated virtualized infrastructure, ideal for businesses migrating from public cloud environments or seeking comprehensive management of their cloud infrastructure.
For those who prefer an open-source approach, HorizonIQ allows customers to run Proxmox VE on our bare metal fleet, enabling the creation of a private cloud.
In this model, HorizonIQ manages the underlying server infrastructure, while customers install and manage their virtual environment using Proxmox VE. This option offers flexibility and control, catering to organizations that favor open-source solutions.
Whether you’re looking for a fully managed VMware environment or the versatility of Proxmox VE on dedicated hardware, HorizonIQ provides the infrastructure and support to meet your specific requirements. Contact us today to learn more.
Explore HorizonIQ
Bare Metal
LEARN MORE
Stay Connected
About Author